Form handling with Thymeleaf
This post explains in detail how you should implement a HTML form with Thymeleaf and Spring Boot.
GET-POST-REDIRECT
The usual way for a web application to request information from the user is to display a form. The user enters the information in the form and submits the form. The server handles the form, checking for validation errors. If there are validation errors, the form is shown again with the errors indicated. Finally, if there are no validation errors, the form action is done on the server. Usually, this will trigger a database update. As a last step, the browser is sent a redirect instruction. This avoids that the form would get submitted again if the user refreshes the browser.
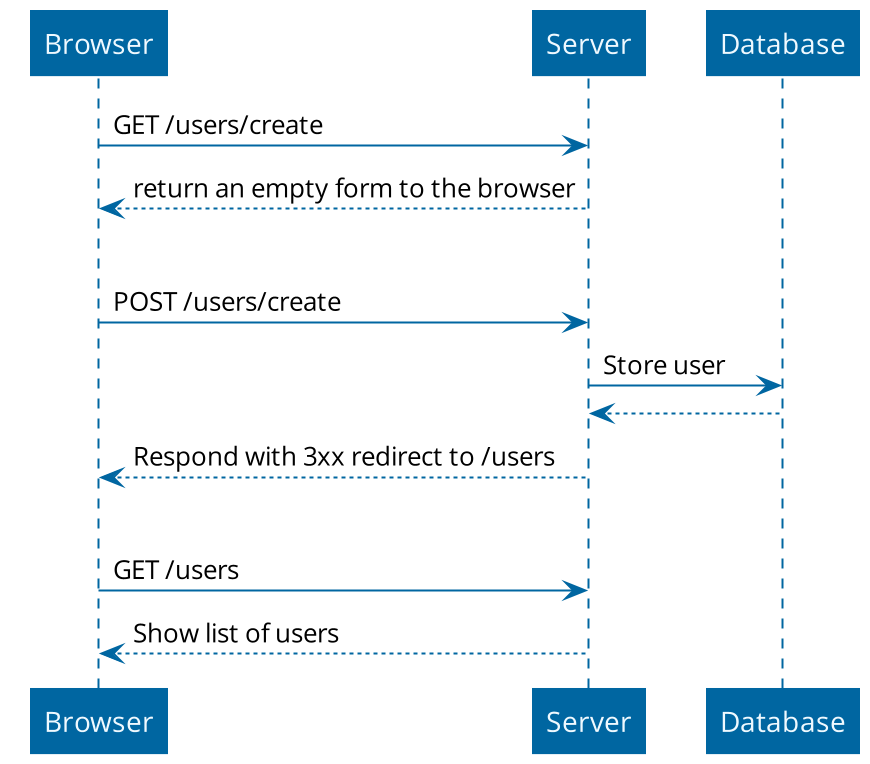
This diagram shows the different steps in the so called GET-POST-REDIRECT flow:

The diagram shows the happy flow of creating a user through a form:
-
The browser navigates to the
/users/createendpoint via aGETrequest. -
The server returns an empty form to the browser
-
The user enters the information in the form, and presses the submit button.
-
The browser does a
POSTrequest with the information from the form. -
The server handles the information, creates a
Userobject and stores it in the database. -
When the user is properly stored, a redirect response code is sent to the browser.
-
The browser reacts to the redirect and does a
GETon the URL that the redirect referred to. -
The server handles the
GETrequest and show all the users.
Implementation
We start from a Spring Boot 2.5.0 application with the following dependencies:
-
Spring Web
-
Thymeleaf
-
Validation
-
Spring Data JPA
-
H2 Database
Use this link to generate the project if you want to follow along.
Domain
We will start the implementation with our domain-related classes.
The User entity class:
package com.wimdeblauwe.examples.formhandlingthymeleaf.user;

import javax.persistence.Entity;
import javax.persistence.GeneratedValue;
import javax.persistence.Id;

@Entity
public class User {
    @Id
    @GeneratedValue
    private Long id;

    private String givenName;
    private String familyName;

    protected User() {
    }

    public User(String givenName,
                String familyName) {
        this.givenName = givenName;
        this.familyName = familyName;
    }

    // getters and setters omitted
}
The UserRepository to store User entities in the database:
package com.wimdeblauwe.examples.formhandlingthymeleaf.user;

import org.springframework.data.jpa.repository.JpaRepository;

public interface UserRepository extends JpaRepository<User, Long> {
}
The UserServiceImpl for doing the actual work of taking the input parameters, creating a User entity and storing it in the database (via the UserRepository):
package com.wimdeblauwe.examples.formhandlingthymeleaf.user;

import org.springframework.stereotype.Service;

import java.util.List;

@Service
public class UserServiceImpl implements UserService {
    private final UserRepository repository;

    public UserServiceImpl(UserRepository repository) {
        this.repository = repository;
    }

    @Override
    public User createUser(UserCreationParameters parameters) {
        User user = new User(parameters.getGivenName(), parameters.getFamilyName());
        return repository.save(user);
    }

    @Override
    public List<User> getUsers() {
        return repository.findAll();
    }
}
The UserService interface that is implemented is coded like this:
package com.wimdeblauwe.examples.formhandlingthymeleaf.user;

import java.util.List;

public interface UserService {
    User createUser(UserCreationParameters parameters);

    List<User> getUsers();
}
The UserCreationParameters used by the createUser method is an immutable object that contains all the info that is needed to create a User.
package com.wimdeblauwe.examples.formhandlingthymeleaf.user;

import org.springframework.util.Assert;

public class UserCreationParameters {
    private final String givenName;
    private final String familyName;

    public UserCreationParameters(String givenName,
                                  String familyName) {
        Assert.notNull(givenName, "givenName should not be null");
        Assert.notNull(familyName, "familyName should not be null");
        this.givenName = givenName;
        this.familyName = familyName;
    }

    public String getGivenName() {
        return givenName;
    }

    public String getFamilyName() {
        return familyName;
    }
}
In our example, there are very little fields to keep the example brief and simple, but in an actual application, there would normally be a lot more there.
Using a parameters class avoids that the createUser() method of the UserService would have lots and lots of parameters.
Web controller
Our little example application is structured using package-by-feature, so all domain-related classes are in the …user package.
The Controller is now placed in a subpackage …user.web to indicate that this is a port to the outside (HTTP) world.
The Controller will need a reference to the UserService to do the actual work of creating the user:
@Controller
@RequestMapping("/users")
public class UserController {
    private final UserService service;

    public UserController(UserService service) {
        this.service = service;
    }

    ...
}
The first method we need is to handle the GET part of the GET-POST-REDIRECT:
    @GetMapping("/create")
    public String showCreateUserForm(Model model) {
        model.addAttribute("formData", new CreateUserFormData());
        return "users/create";
}-
We declare
@GetMapping("/create")which, together with the@RequestMapping("/users")on the class, indicates to the Spring MVC framework that this method should be called for aGETreqest to/users/create. -
The method takes a
Modelparameter which Spring MVC will inject. -
We add an empty
CreateUserFormDataobject to the model under theformDatakey. -
We return
users/createso that Thymeleaf will render thesrc/main/resources/templates/users/create.htmltemplate.
Note how we are not using our immutable UserCreationParameters object, but we use a dedicated CreateUserFormData object to map the fields of our HTML form to a Java object.
The CreateUserFormData object looks like this:
package com.wimdeblauwe.examples.formhandlingthymeleaf.user.web;

import com.wimdeblauwe.examples.formhandlingthymeleaf.user.UserCreationParameters;

import javax.validation.constraints.NotNull;
import javax.validation.constraints.Size;

public class CreateUserFormData {
    @NotNull
    @Size(min = 1, max = 400)
    private String givenName;

    @NotNull
    @Size(min = 1, max = 400)
    private String familyName;

    // getters and setters omitted

    public UserCreationParameters toParameters() {
        return new UserCreationParameters(givenName, familyName);
    }
}
Important points:
-
The
CreateUserFormDataalso resides in the…user.webpackage as it is something that is only needed for our HTML port. -
There are validation annotations present to ensure
givenNameandfamilyNamecontain valid fields. -
The class is mutable. It does not throw any exception to avoid that a field contains an invalid value. This is needed because we will set up a two-way binding from the HTML input fields to the fields of this class. We want to be able to store "invalid" values in our form data objects so that we when show the HTML form again to the user, his invalid input is still there. This would be impossible if we use the
UserCreationParametersobject directly (as that class probably will throw anIllegalArgumentExceptionwhen invalid data is passed in). -
There is a method to convert from this object to the immutable
UserCreationParametersobject.
Next up: the POST method implementation:
    @PostMapping("/create")
    public String doCreateUser(@Valid @ModelAttribute("formData") CreateUserFormData formData,
                               BindingResult bindingResult,
                               Model model) {
        if (bindingResult.hasErrors()) {
            return "users/create";
        }

        service.createUser(formData.toParameters());

        return "redirect:/users";
    }
To repeat: when the user submits the form, a HTTP POST is done to the application. This method will handle this request.
-
The method is annotated with
@PostMappingto indicate that it should be called when aPOSTis done. -
The first parameter of the method is our
CreateUserFormDataobject. By using@ModelAttribute("formData"), we ask Spring to inject the instance here. It will contain the values of the input fields of our Thymeleaf template. -
The
CreateUserFormDatais also annotated with@Validto indicate that the validation annotations on the object need to be checked. If there are any validation errors, they will be added to theBindingResultinstance following this parameter. -
Using the
if(bindingResult.hasErrors), we check if there are validation errors. If there are errors, we return theusers/createString, which tells Spring to show thecreate.htmltemplate again. -
If there are no errors, we convert from the
CreateUserFormDatato theUserCreationParametersobject and ask theserviceto create the user. -
Finally, we tell the browser to redirect to the
/usersendpoint by returning the Stringredirect:/users.
To recap, this is the full source code of the UserController:
package com.wimdeblauwe.examples.formhandlingthymeleaf.user.web;

import com.wimdeblauwe.examples.formhandlingthymeleaf.user.UserService;
import org.springframework.stereotype.Controller;
import org.springframework.ui.Model;
import org.springframework.validation.BindingResult;
import org.springframework.web.bind.annotation.GetMapping;
import org.springframework.web.bind.annotation.ModelAttribute;
import org.springframework.web.bind.annotation.PostMapping;
import org.springframework.web.bind.annotation.RequestMapping;

import javax.validation.Valid;

@Controller
@RequestMapping("/users")
public class UserController {
    private final UserService service;

    public UserController(UserService service) {
        this.service = service;
    }

    @GetMapping("/create")
    public String showCreateUserForm(Model model) {
        model.addAttribute("formData", new CreateUserFormData());
        return "users/create";
    }

    @PostMapping("/create")
    public String doCreateUser(@Valid @ModelAttribute("formData") CreateUserFormData formData,
                               BindingResult bindingResult,
                               Model model) {
        if (bindingResult.hasErrors()) {
            return "users/create";
        }

        service.createUser(formData.toParameters());

        return "redirect:/users";
    }

    @GetMapping
    public String listUsers(Model model) {
        model.addAttribute("users", service.getUsers());

        return "users/list";
    }
}
Thymeleaf template
Now that we have all Java code in place, we can code the Thymeleaf HTML template:
<!DOCTYPE html>
<html lang="en"
      xmlns:th="http://www.thymeleaf.org">
<head>
    <meta charset="UTF-8">
    <title>Users</title>
</head>
<body>
<main>
    <h1>Create user</h1>
    <form th:object="${formData}"
          th:action="@{/users/create}"
          method="post"> (1)
        <div>
            <label for="givenName">Given name</label>
            <input id="givenName" type="text"
                   th:field="*{givenName}"> (2)
            <p th:if="${#fields.hasErrors('givenName')}"
               th:text="${#strings.listJoin(#fields.errors('givenName'), ', ')}"></p> (3)
        </div>
        <div>
            <label for="familyName">Family name</label>
            <input id="familyName" type="text"
                   th:field="*{familyName}">
            <p th:if="${#fields.hasErrors('familyName')}"
               th:text="${#strings.listJoin(#fields.errors('familyName'), ', ')}"></p>
        </div>
        <button type="submit">Create user</button>
    </form>
</main>

</body>
</html>| 1 | The th:object attribute refers to the key under which we put our CreateUserFormData instance in the model (formData in this example).
The th:action has the URL for the @PostMapping method.
Finally, the method attribute is set to post since we want to use the HTTP POST method. |
| 2 | Each field in our CreateUserFormData has a corresponding HTML <input/> tag. Using th:field=*{…}, we can setup a two-way binding between the HTML input and the field in our form data object. |
| 3 | Here we add some code to display validation errors if there are. This is a very rude implementation. Most likely an actual application would use translated validations and some extra styling. My book Taming Thymeleaf shows in detail how to do this. |
Test drive
We are now ready to take our application for a test ride.
Start the Spring Boot application from your IDE (or via the command line of your favorite build tool) and open a browser on http://localhost:8080/users/create`.
You should see the empty form:

If we only enter a given name and not a family name, we get a validation error:

After we fixed the validation error, we get redirected to the list of users. We see our just created user:

If we open up the developer tools of the browser, we can clearly see the GET-POST-REDIRECT that has happened:

-
The first
GETis the browser that requests the empty form -
The second call is the
POSTwhen we submit the form data, which returns the 302 HTTP status code that tells the browser to redirect. -
The third call is the
GETafter the redirect.
Conclusion
Properly implementing form handling is not that hard if you follow the rules that this blog post explains.
While it might seems a bit overkill for this example to have separate CreateUserFormData and UserCreationParameters classes, I can assure you that it will make your code a lot easier to maintain as it grows in size and complexity.
To see the full code of this example, redirect yourself to GitHub.

