
npm install lit
npm install -D typescript sass-embeddedAuthoring Web Components in a Spring Boot Thymeleaf project

Interested in learning more about Thymeleaf? Check out my book
Taming Thymeleaf.
The book combines all of my Thymeleaf knowledge into an easy to follow step-by-step guide.
This blog post will show you how to create your own Web Components in a Spring Boot with Thymeleaf project. The setup will use Vite to be able to write the Web Components in TypeScript and have live reload of the components so you can easily edit them and use them in your Thymeleaf templates.
Web Components are a set of standardized browser APIs that allow developers to create reusable, encapsulated HTML elements with their own functionality. You can think of Web Components as a way to create custom HTML tags that behave like built-in elements, but with your own defined logic and styling.
Web Components let you define self-contained units of HTML, CSS, and JavaScript that can be easily shared across your application or even between different projects. They consist of four main technologies: Custom Elements, Shadow DOM, HTML Templates, and ES Modules. These technologies work together to provide a component-based approach to front-end development, allowing for better code organization and reusability directly in the browser, without the need for additional frameworks or libraries.
Project Setup
Spring Boot project generation
Initialize your project via the ttcli command line tool. I selected the following options:
-
Group:
com.wimdeblauwe.examples -
Artifact:
thymeleaf-web-components -
Project name:
Thymeleaf Web Components -
Spring Boot version:
3.3.4 -
Live reload implementation:
Vite with Tailwind CSS
Add setup to author Web Components
We will write the Web Components in TypeScript and use the Lit library. We will also configure SCSS support, just to show how to do it if you want it. You can certainly use plain CSS if that is your preference.
Add the necessary npm dependencies:
To configure TypeScript, we need to create a tsconfig.json file.
To avoid having to write it ourselves, we can use the Vite Lit/TypeScript starter to generate one for us and copy it over.
Go into a temporary directory and run the starter:
cd /tmp
npm create vite@latest
Select "Lit" and "TypeScript".
Now copy the generated tsconfig.json into the root of our Spring Boot project.
cp vite-project/tsconfig.json ~/my-projects/thymeleaf-web-componentsThe Web Components will be written in the src/main/resources/static/wc directory.
It needs to be a sub-directory of the static directory to have the live reload working.
Point the tsconfig.json file to the appropriate location by updating the include property:
tsconfig.json
{
  ...
  "include": ["src/main/resources/static/wc"]
}
Write a Web Component
Create a new file src/main/resources/static/wc/button/button.ts:
import {html, LitElement, unsafeCSS} from "lit";
import {customElement, property} from "lit/decorators.js";
import styles from "./button.component.scss?inline";

export type MyButtonVariant = "primary" | "outline" | "danger";

@customElement("my-button")
export class MyButton extends LitElement {
    static styles = unsafeCSS(styles);

    @property()
    variant: MyButtonVariant = "primary";

    @property()
    label: string = "Button";

    override render() {
        return html`
            <button type="button" class="my-button ${this.variant}">
                ${this.label}
            </button>
        `;
    }
}
Some important points in this code if you have never written a Web Component before:
-
The
@customElementdecorator defines the name of the Web Component. In this example, it means that the component can be used in HTML as<my-button>. -
The
@propertydecorator defines the attributes of the component. In this example, there are two properties that will be used in the HTML like this:<my-button variant="danger" label="Delete"></my-button>. If the attributes are not used in the HTML, then the defaults (primaryandButton) are used. -
The
renderfunction returns the HTML that is rendered in the Shadow DOM. We use the property values during the rendering to set the label and add a CSS class. -
Via
import styles from "./button.component.scss?inline";andstatic styles = unsafeCSS(styles);, the button-specific CSS is loaded when the Web Component is used.
Create the CSS for the component at src/main/resources/static/wc/button/button.component.scss:
.my-button {
  padding: 0.5rem;
  border: none;
  border-radius: 0.25rem;

  &:hover {
    cursor: pointer;
  }

  &.primary {
    color: white;
    background-color: dodgerblue;
    border: 1px solid dodgerblue;

    &:hover {
      background-color: rgba(30, 144, 255, 0.66);
    }
  }

  &.outline {
    color: #343434;
    background-color: white;
    border: 1px solid #cccccc;

    &:hover {
      background-color: rgba(30, 144, 255, 0.20);
      color: rgba(30, 144, 255, 0.66);
    }
  }

  &.danger {
    color: white;
    background-color: red;
    border: 1px solid red;

    &:hover {
      background-color: rgba(255, 0, 0, 0.66);
    }
  }
}
With the Web Component defined, we can use it in our application.
Update src/main/resources/templates/main.html to have Vite load the Web Component:
<head>
...
<vite:vite>
<vite:entry value="/css/application.css"></vite:entry>
<vite:entry value="/wc/button/button.ts"></vite:entry>
</vite:vite>
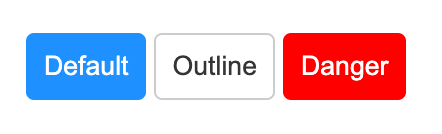
</head>Finally, add the web component in src/main/resources/templates/index.html with a few variants:
    <div class="flex gap-1 m-5">
        <my-button label="Default"></my-button>
        <my-button label="Outline" variant="outline"></my-button>
        <my-button label="Danger" variant="danger"></my-button>
    </div>
To test, run npm run dev and start the Spring Boot application with the local profile.
Open your browser at http://localhost:8080 and you should be greeted by your newly created Web Component:
You now have live reload for the Web Components and the Thymeleaf templates.
Try to change the SCSS or the TypeScript code of the Web Component. The browser should automatically refresh when you save your changes. You can also update the Thymeleaf template HTML and see immediate updates upon saving.
Avoid TypeScript warning
You might have noticed that IntelliJ shows a warning in the TypeScript code of the Web Component about the import of the SCSS:
TS2307: Cannot find module ./ button. component. scss?inline or its corresponding type declarationsTo fix this, create a file src/main/resources/wc/scss.d.ts with this contents:
declare module "*.scss?inline" {
  import { CSSResultGroup } from "lit";
  const styles: CSSResultGroup;
  export default styles;
}
This should remove the error if you open the button.ts file again.
Production build
For the production build, we have to ensure our Web Component is known in the options of Vite.
Update vite.config.js to include a reference to the Web Component:
        rollupOptions: {
            input: [
                '/static/css/application.css',
                '/static/wc/button/button.ts'
            ]
        },
Run npm run build to run the production build.
You can now test this build by running the Spring Boot application.
Make sure the local profile is not active so the production mode of Vite is used.
In the Developer Tools of your browser, you can see the production build is now active because there is something like this in the <head> section:
<head>
    ...
    <link rel="stylesheet" href="assets/application-DCOtb3Pl.css">
    <script type="module" src="assets/button-ClhAQ5Li.js"></script>
</head>|
There is currently a deprecation warning during the Vite production build if you use SCSS: You can avoid this warning by adding the following to |
Setting Web Component attributes via Thymeleaf
If you want to dynamically set an attribute of the web component via Thymeleaf, then you can just prefix the attribute with th: and use a Thymeleaf expression.
For example:
<my-button th:label="#{delete}" variant="danger"></my-button>This examle uses the delete message from the translations, but you can use any model attribute as well via the standard ${…} syntax.
Conclusion
Web Components offer a powerful way to create reusable, encapsulated UI elements that can enhance your Spring Boot and Thymeleaf projects. By leveraging Vite for build processes and live reloading, we’ve set up a development environment that combines the best of both worlds: the robust backend capabilities of Spring Boot and the flexibility of modern frontend development.
See thymeleaf-web-components on GitHub for the full sources of this example.
If you have any questions or remarks, feel free to post a comment at GitHub discussions.
If you want to be notified in the future about new articles, as well as other interesting things I'm working on, join my mailing list!
I send emails quite infrequently, and will never share your email address with anyone else.