This blog post will show you how to create your own React components in a Spring Boot with Thymeleaf project. The setup will use Vite to be able to write the React components in TypeScript and have live reload of the components so you can easily edit them and use them in your Thymeleaf templates. In the end, we will also see how we can use an existing React library in our application.
Integrating React components into a Spring Boot Thymeleaf project allows developers to leverage the power of React for creating dynamic, interactive UI elements while maintaining the server-side rendering benefits of Thymeleaf. This approach is particularly useful when you want to gradually introduce React into an existing Thymeleaf project or when you need to combine server-side rendering with client-side interactivity for optimal performance and user experience.
Project Setup
Spring Boot project generation
Initialize your project via the ttcli command line tool. I selected the following options:
-
Group:
com.wimdeblauwe.examples -
Artifact:
thymeleaf-react -
Project name:
Thymeleaf React -
Spring Boot version:
3.3.4 -
Live reload implementation:
Vite -
Web libraries:
Tailwind CSS
Update setup to use React
After ttcli generated the project, we need to make some adjustments to be able to use React.
Start by adding the necessary npm dependencies:
npm install react react-dom
npm install -D typescript @vitejs/plugin-react @types/react @types/react-dom
Update vite.config.js to use the React plugin:
import react from "@vitejs/plugin-react";

export default defineConfig({
    plugins: [
        springBoot(),
        react()
    ],
    ...
});
To configure TypeScript, we need to create a tsconfig.json file.
To avoid having to write it ourselves, we can use the Vite React/TypeScript starter to generate one for us and copy it over.
Go into a temporary directory and run the starter:
cd /tmp
npm create vite@latest
Select "React" and "TypeScript".
Now copy the generated tsconfig.json, tsconfig.app.json and tsconfig.node.json into the root of our Spring Boot project.
cp vite-project/tsconfig.* ~/my-projects/thymeleaf-reactNow we also need to add some code to make the Hot Module Reload of Vite work nicely with React.
Open src/main/resources/templates/layout/main.html and add the <vite:react-refresh></vite:react-refresh> tag:
<html ...>
    <head>
      <meta charset="UTF-8">
      <meta name="viewport" content="width=device-width, initial-scale=1">
      <title></title>
      <vite:react-refresh></vite:react-refresh>
      <vite:client></vite:client>
      <vite:vite>
        <vite:entry value="/css/application.css"></vite:entry>
      </vite:vite>
    </head>
...
</html>
The React components will be written in the src/main/resources/static/react directory.
It needs to be a sub-directory of the static directory to have the live reload working.
Point the tsconfig.app.json file to the appropriate location by updating the include property:
{
  ...
  "include": ["src/main/resources/static/react"]
}
Write a React component
With Thymeleaf, the HTML is rendered on the server, and the full page is sent to the browser for rendering. To use a React component in this setup, we need to take a few steps:
-
First, we place an empty
<div>element in our Thymeleaf template. -
At runtime, the JavaScript engine takes over on the client-side.
-
It then renders the React component’s HTML.
-
Finally, it attaches this newly generated content to the empty
<div>we prepared earlier.
This approach allows us to combine server-side rendering with dynamic, client-side React components.
So we need to first update our index.html with this <div>:
<div id="list-example-wrapper"></div>We will create a simple React component to get started.
Add the file ListExample.tsx to the project:
import {createRoot} from 'react-dom/client'

let element = document.getElementById('list-example-wrapper'); (1)
createRoot(element!).render( (2)
    <ListExample/>
)

export default function ListExample() { (3)
  return (
      <ul>
        {["Wim", "Thomas", "Oliver"]
        .map(name => <li key={name}>Hello {name} from React</li>)} (4)
      </ul>
  )
}| 1 | Get the element in the Thymeleaf template where we will attach our React component. |
| 2 | Render the ListExample React component on the element. |
| 3 | Declare a React Function Component. It might seem a bit strange at first to have a function with a PascalCase name, but this is how it is done in React. |
| 4 | The key attribute is used here to give each list item a unique identifier.
React uses these keys to efficiently update the DOM when the list changes.
Without keys, React might unnecessarily re-render all items even if only one changed. |
Start the Spring Boot application with the local profile and run npm run dev to have everything ready for testing.
Open the browser at http://localhost:8080.
You should now see this:
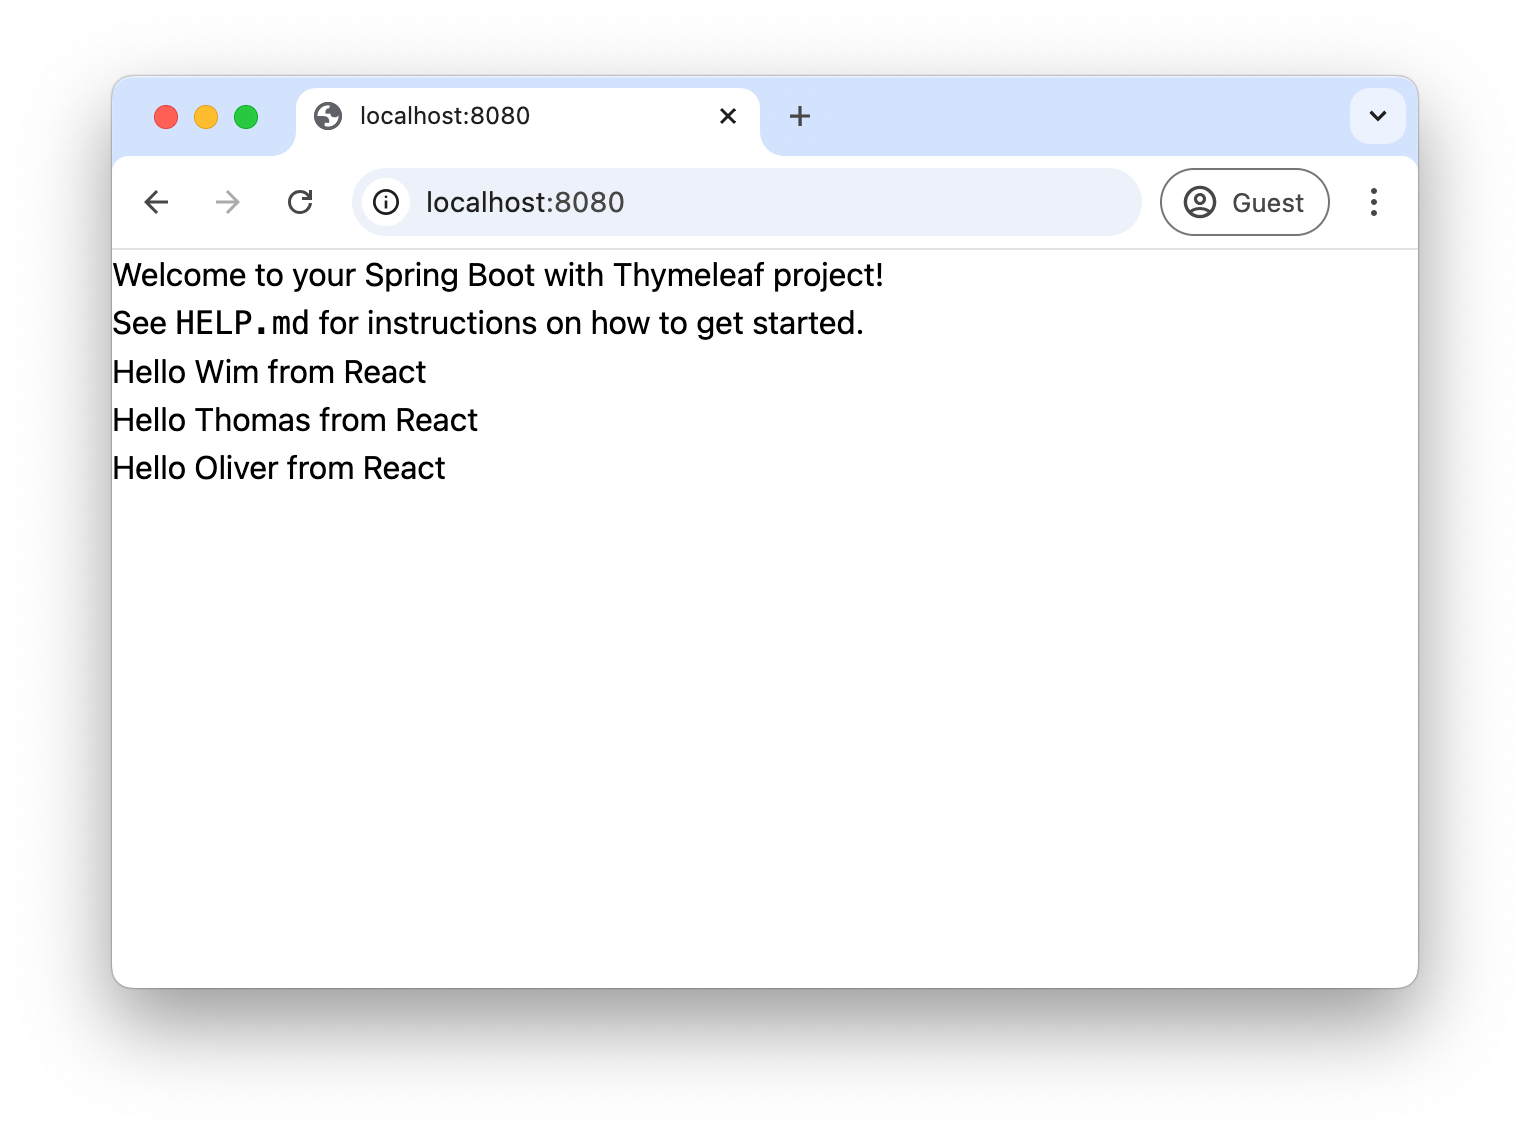
If you look closely, you’ll notice that the first 2 lines are rendered immediately (by Thymeleaf), and then the last 3 lines are rendered afterwards (by JavaScript and the React library).
Styling with Tailwind CSS
The setup that was generated by ttcli allows to use Tailwind CSS classes in our Thymeleaf templates.
But using them in the React component does not work.
For that, change tailwind.config.js to include the path to the React components:
/** @type {import('tailwindcss').Config} */
export default {
  content: ['./src/main/resources/templates/**/*.html',
  './src/main/resources/static/react/**'],
  theme: {
    extend: {},
  },
  plugins: [],
}
We can now use Tailwind CSS classes like this:
...

export default function ListExample() {
  return (
      <ul className={"m-4 pl-2 py-2 bg-amber-200"}> (1)
        {["Wim", "Thomas", "Oliver"]
        .map(name => <li key={name}>Hello {name} from React</li>)}
      </ul>
  )
}| 1 | Tailwind CSS classes added via the className property. |
Note how you need to use className instead of the normal class with React.
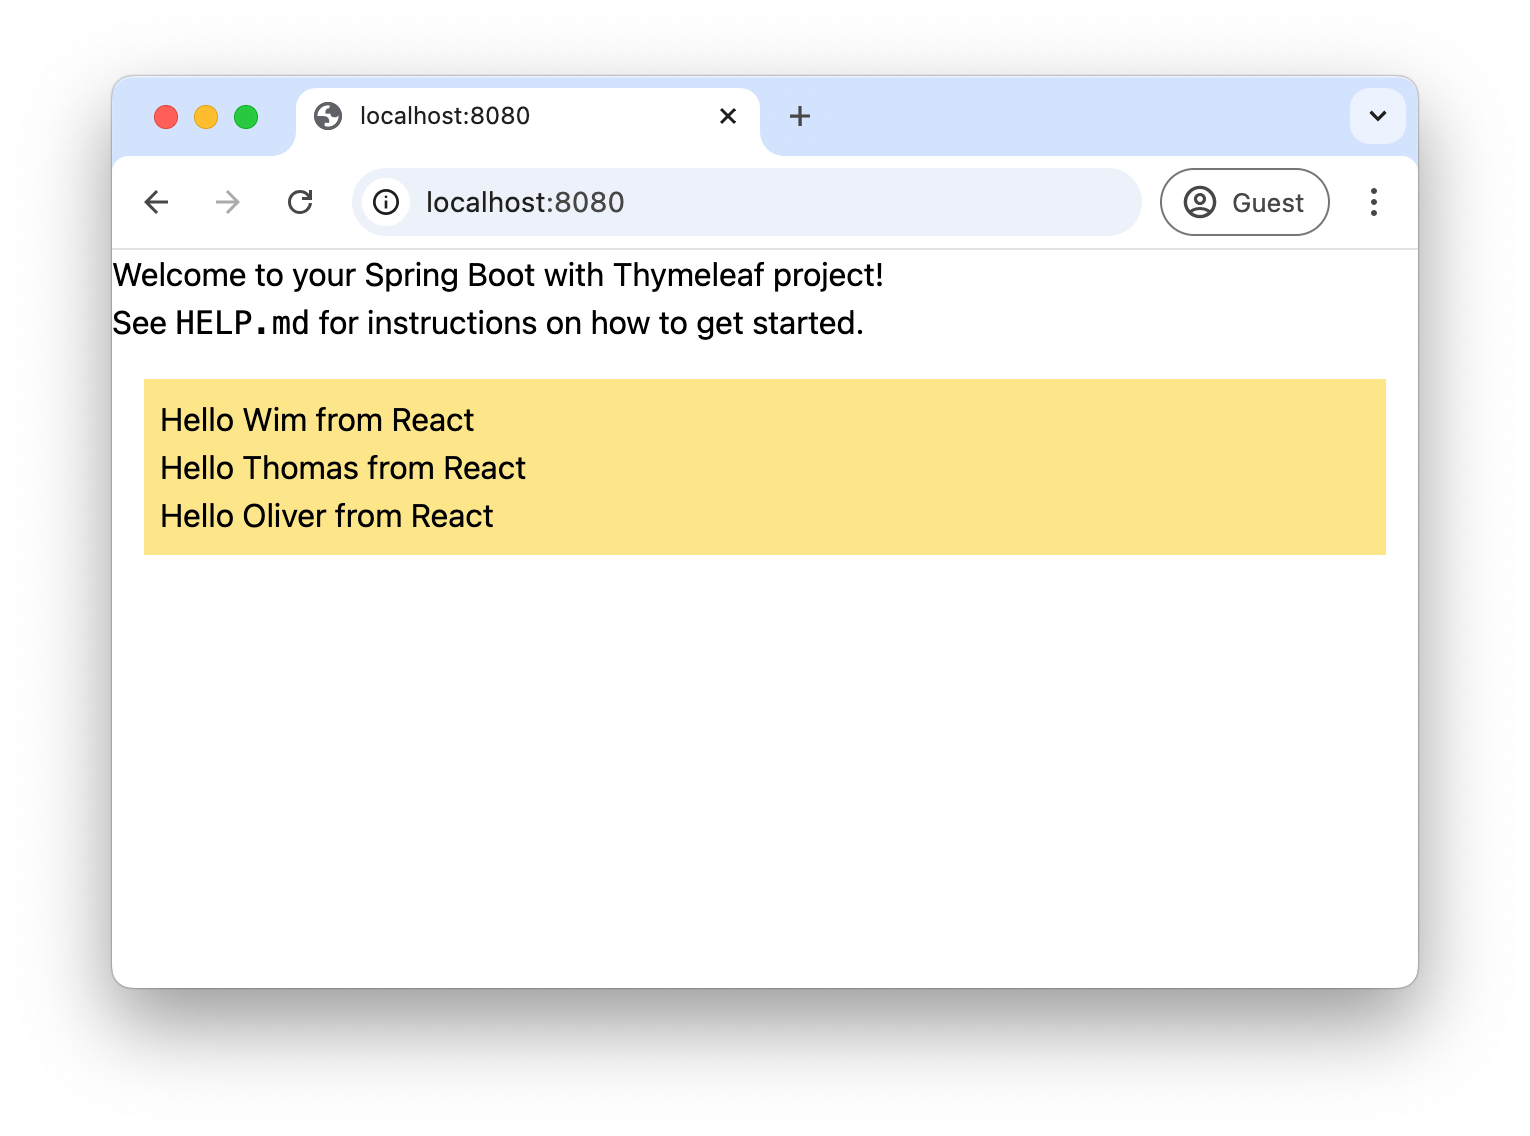
The result with the styling:
If you are not using Tailwind CSS, you can just edit your application.css and style everything that way.
Use a component from a React library
We can also use a React component library instead of writing our own React components. For the purpose of this demonstration, we will use Flowbite React.
Install the dependency:
npm i flowbite-reactUpdate tailwind.config.js for Flowbite React:
/** @type {import('tailwindcss').Config} */
const flowbite = require("flowbite-react/tailwind");

export default {
  content: ['./src/main/resources/templates/**/*.html',
  './src/main/resources/static/react/**',
  flowbite.content()],
  theme: {
    extend: {},
  },
  plugins: [flowbite.plugin()],
}
We will start with a simple button component.
Add a <div> to index.html where the button should appear:
<div id="flowbite-example-wrapper" class="mt-4"></div>Create src/main/resources/static/react/FlowbiteExample.tsx:
import { Button } from "flowbite-react";
import {createRoot} from 'react-dom/client'

let element = document.getElementById('flowbite-example-wrapper');
createRoot(element!).render(
    <FlowbiteExample/>
)
export default function FlowbiteExample() {
  return <Button>Click me</Button>;
}
Add the new component to main.html:
...
<vite:vite>
<vite:entry value="/css/application.css"></vite:entry>
<vite:entry value="/react/ListExample.tsx"></vite:entry>
<vite:entry value="/react/FlowbiteExample.tsx"></vite:entry>
</vite:vite>
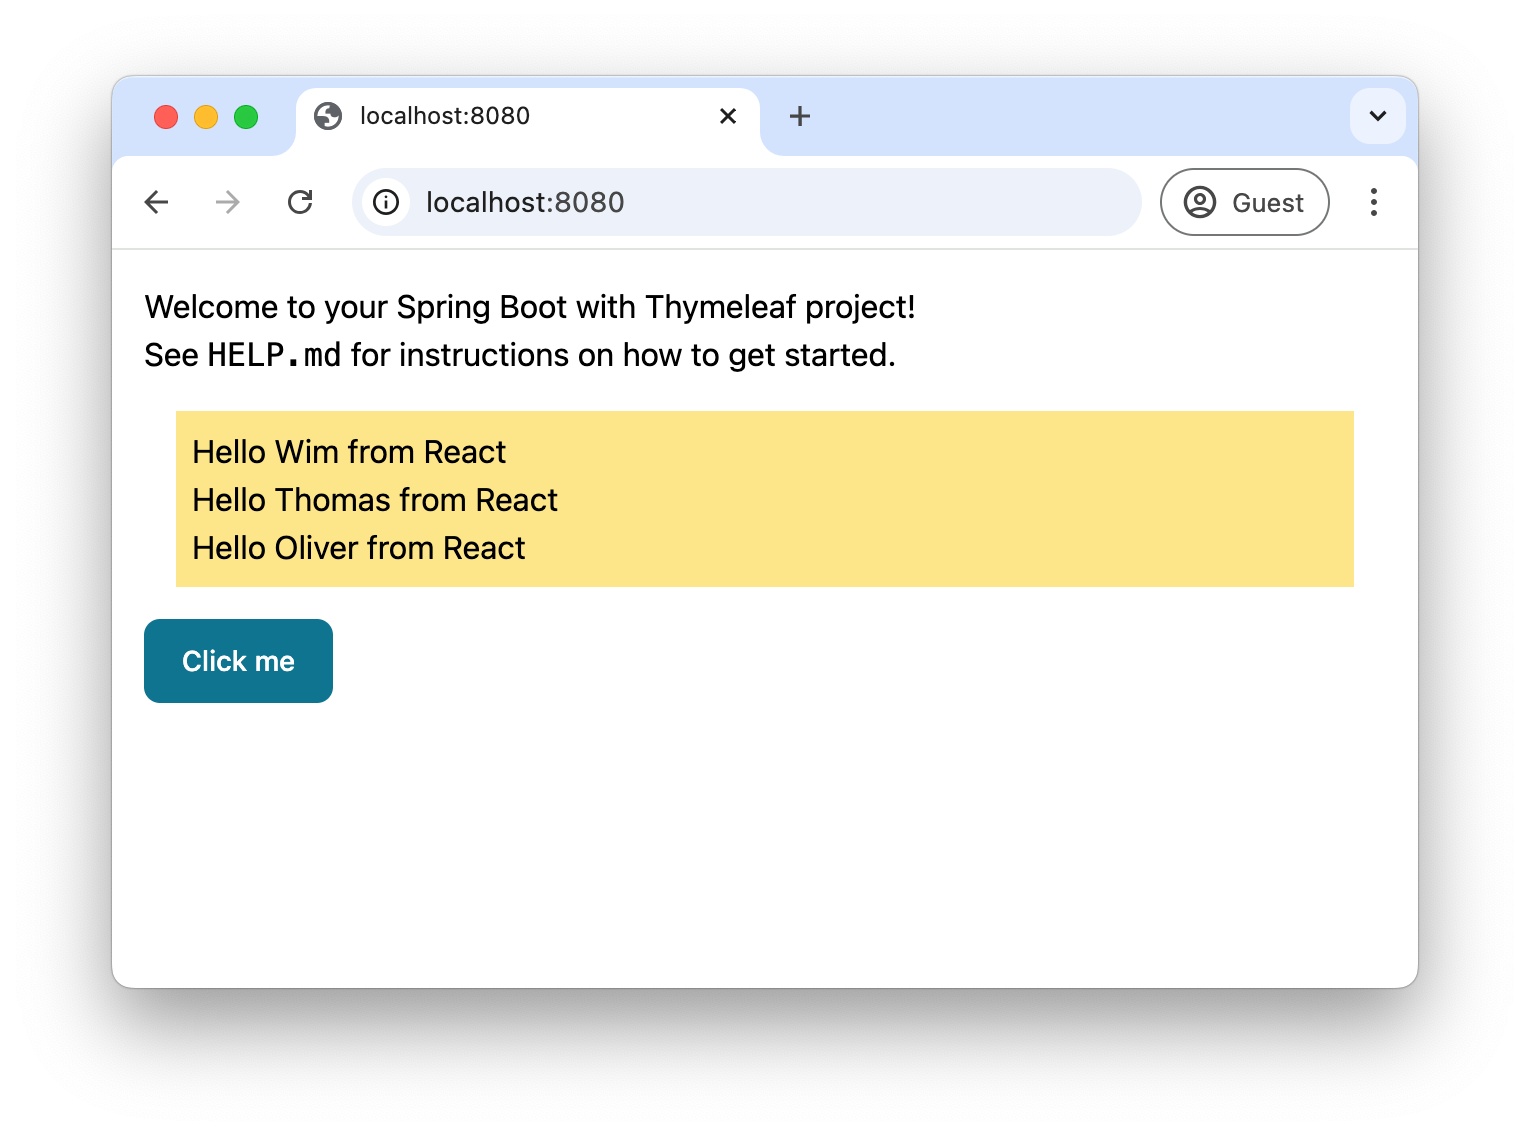
...We now have a button on our page coming from the Flowbite React library:
Pass Thymeleaf variables to a React component
Now suppose you want to have multiple buttons on the page, and those buttons should have different labels. The text of the labels should come from Thymeleaf variables.
As an example, we will create a button bar with an Ok and a Cancel button. The label on the buttons will come from translations that are available server-side.
Let’s start by creating our button component:
import { Button } from "flowbite-react";
import {createRoot} from 'react-dom/client'

let element = document.getElementById('button-bar-wrapper')!;
const okButtonLabel = element.getAttribute('ok-label') || "OK";
const cancelButtonLabel = element.getAttribute('cancel-label') || "Cancel";
createRoot(element).render(
    <ButtonBar okButtonLabel={okButtonLabel} cancelButtonLabel={cancelButtonLabel}/>
)

interface ButtonBarProps {
  okButtonLabel: string;
  cancelButtonLabel: string;
}

export default function ButtonBar({okButtonLabel, cancelButtonLabel}:ButtonBarProps) {
  return (
      <div className="flex justify-around bg-gray-100 rounded-md py-2">
        <Button>{okButtonLabel}</Button>
        <Button color="light">{cancelButtonLabel}</Button>
      </div>
  );
}
Some things to note:
-
We added an interface
ButtonBarPropsthat encodes the variables that we can pass from the HTML (Thymeleaf) template to the React component. -
Using
element.getAttribute(".."), we can read an attribute that is present on the HTML wrapper element. The value of that element can come from a Thymeleaf variable (or i18n message).
Update main.html with the new component:
<vite:entry value="/react/ButtonBar.tsx"></vite:entry>Update index.html with an empty div where the button bar will be mounted:
<div id="button-bar-wrapper"
     class="mt-4"
     th:ok-label="#{ok}"
     th:cancel-label="#{cancel}"></div>
What we do here is adding the ok-label and cancel-label attributes when the HTML is rendered.
The value is taken from the Spring Boot translation files.
At runtime, the React component reads those values and renders them inside the buttons.
Add messages.properties and messages_nl.properties to have the translations on the server-side:
ok=OK
cancel=Cancelok=OK
cancel=AnnulerenYou will need to restart your Spring Boot application after this.
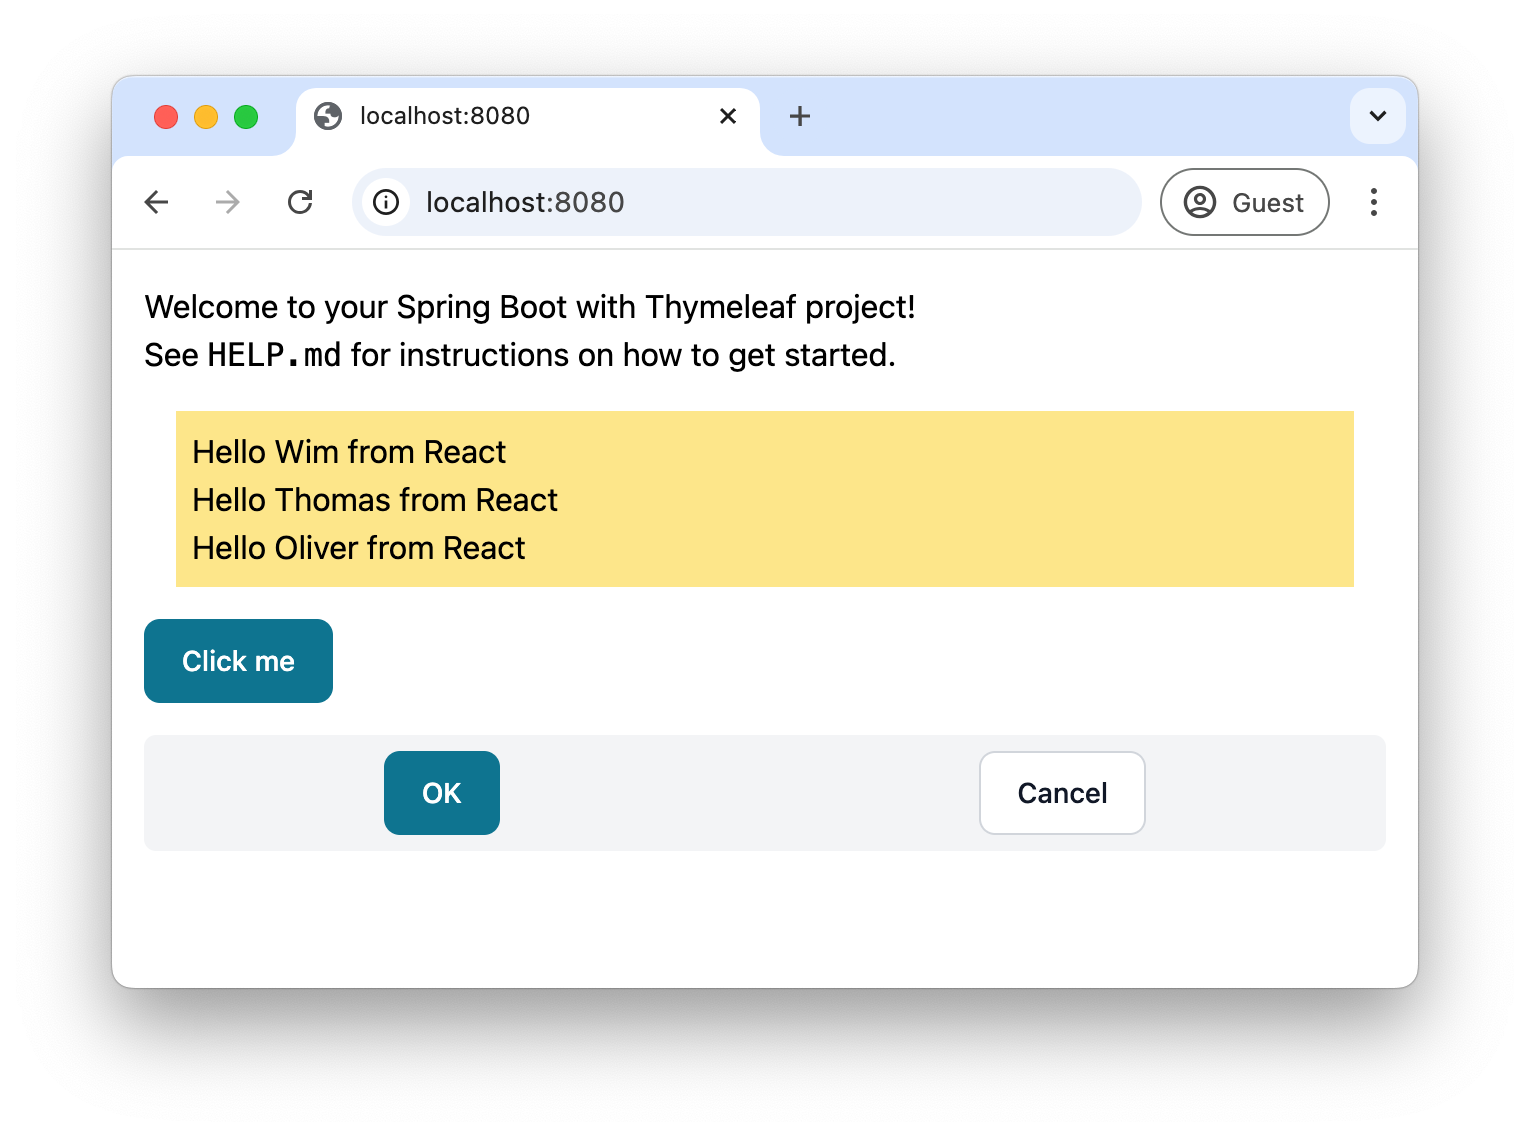
If you are on an English language browser, you should see something like this:
If you change the locale of the browser to Dutch (nl), then you see:

Note how the label changed to "Annuleren".
Pass complex data to a React component
Using a custom attribute is an easy way to pass data from the Spring controller to the React component, but it is limited to simple strings. If we want to pass more complex data, we need to do this differently.
There are two ways to pass complex data to a React component:
-
Embed the data in the HTML page.
-
Have the React component fetch data from a REST endpoint.
This blog will only explain how to embed the data in the HTML page. Setting up a JSON endpoint and fetching the data from React is a standard React use case that is not covered here.
For this example, we will create a new page in the application.
Update HomeController to have a new endpoint:
package com.wimdeblauwe.examples.thymeleaf_react;

import java.time.LocalDate;
import java.util.List;
import org.springframework.stereotype.Controller;
import org.springframework.ui.Model;
import org.springframework.web.bind.annotation.GetMapping;
import org.springframework.web.bind.annotation.RequestMapping;

@Controller
@RequestMapping("/")
public class HomeController {
    @GetMapping
    public String index(Model model) {
        return "index";
    }

    @GetMapping("/timeline")
    public String timeline(Model model) {
        model.addAttribute("occurrences",
            List.of(
                new Occurrence(LocalDate.parse("2004-03-24"),
                    "Spring framework released",
                    "The first official version of the Spring framwork is released."),
                new Occurrence(LocalDate.parse("2014-04-01"),
                    "Spring Boot 1.0 released",
                    "Spring Boot brings a revolution to the Spring portfolio.")
                )
            );

        return "timeline";
    }

    public record Occurrence(LocalDate date, String title, String content) {

    }
}
The new /timeline endpoint has an occurrences variable that contains a list of things that have occurred at a certain point in time.
We will now render this data as JSON inside a Thymeleaf template timeline.html:
<!DOCTYPE html>
<html lang="en"
      xmlns:th="http://www.thymeleaf.org"
      xmlns:layout="http://www.ultraq.net.nz/thymeleaf/layout"
      layout:decorate="~{layout/main}">
<body>
<div layout:fragment="content" class="m-4">
    <div id="timeline-wrapper"></div> (1)
</div>
<th:block layout:fragment="script-content">
    <script type="application/json" id="occurrences-data" th:inline="javascript"> (2)
        /*[[${occurrences}]]*/
    </script>
</th:block>
</body>
</html>| 1 | Empty div where we will mount our React component. |
| 2 | Output the occurrences model variable as JSON. |
Now we can create a React component based on the Flowbite React timeline component:
import {
  Timeline,
  TimelineBody,
  TimelineContent,
  TimelineItem,
  TimelinePoint,
  TimelineTime,
  TimelineTitle
} from "flowbite-react";
import {createRoot} from "react-dom/client";

let element = document.getElementById('timeline-wrapper')!;
createRoot(element).render(
    <OccurencesTimeline/>
)

type Occurrence = { (1)
  date: string;
  title: string;
  content: string;
};

export default function OccurencesTimeline() {
  const occurrences: Occurrence[] = JSON.parse(document.getElementById('occurrences-data')!.innerHTML) (2)

  return (
      <Timeline>
        {occurrences.map(({date, title, content}) => (3)
            <TimelineItem>
              <TimelinePoint/>
              <TimelineContent>
                <TimelineTime>{date}</TimelineTime>
                <TimelineTitle>{title}</TimelineTitle>
                <TimelineBody>
                  {content}
                </TimelineBody>
              </TimelineContent>
            </TimelineItem>)}

      </Timeline>
  )
}| 1 | Define a type similar to the Java record. |
| 2 | Read the occurrences-data from the HTML as JSON. |
| 3 | Loop over all the occurrences and output a <TimelineItem> for each occurrence. |
Update main.html to include the new React component:
  ...
  <vite:entry value="/react/OccurencesTimeline.tsx"></vite:entry>
  ...
With all this in place, our timeline will render using the data coming from the Spring MVC controller:
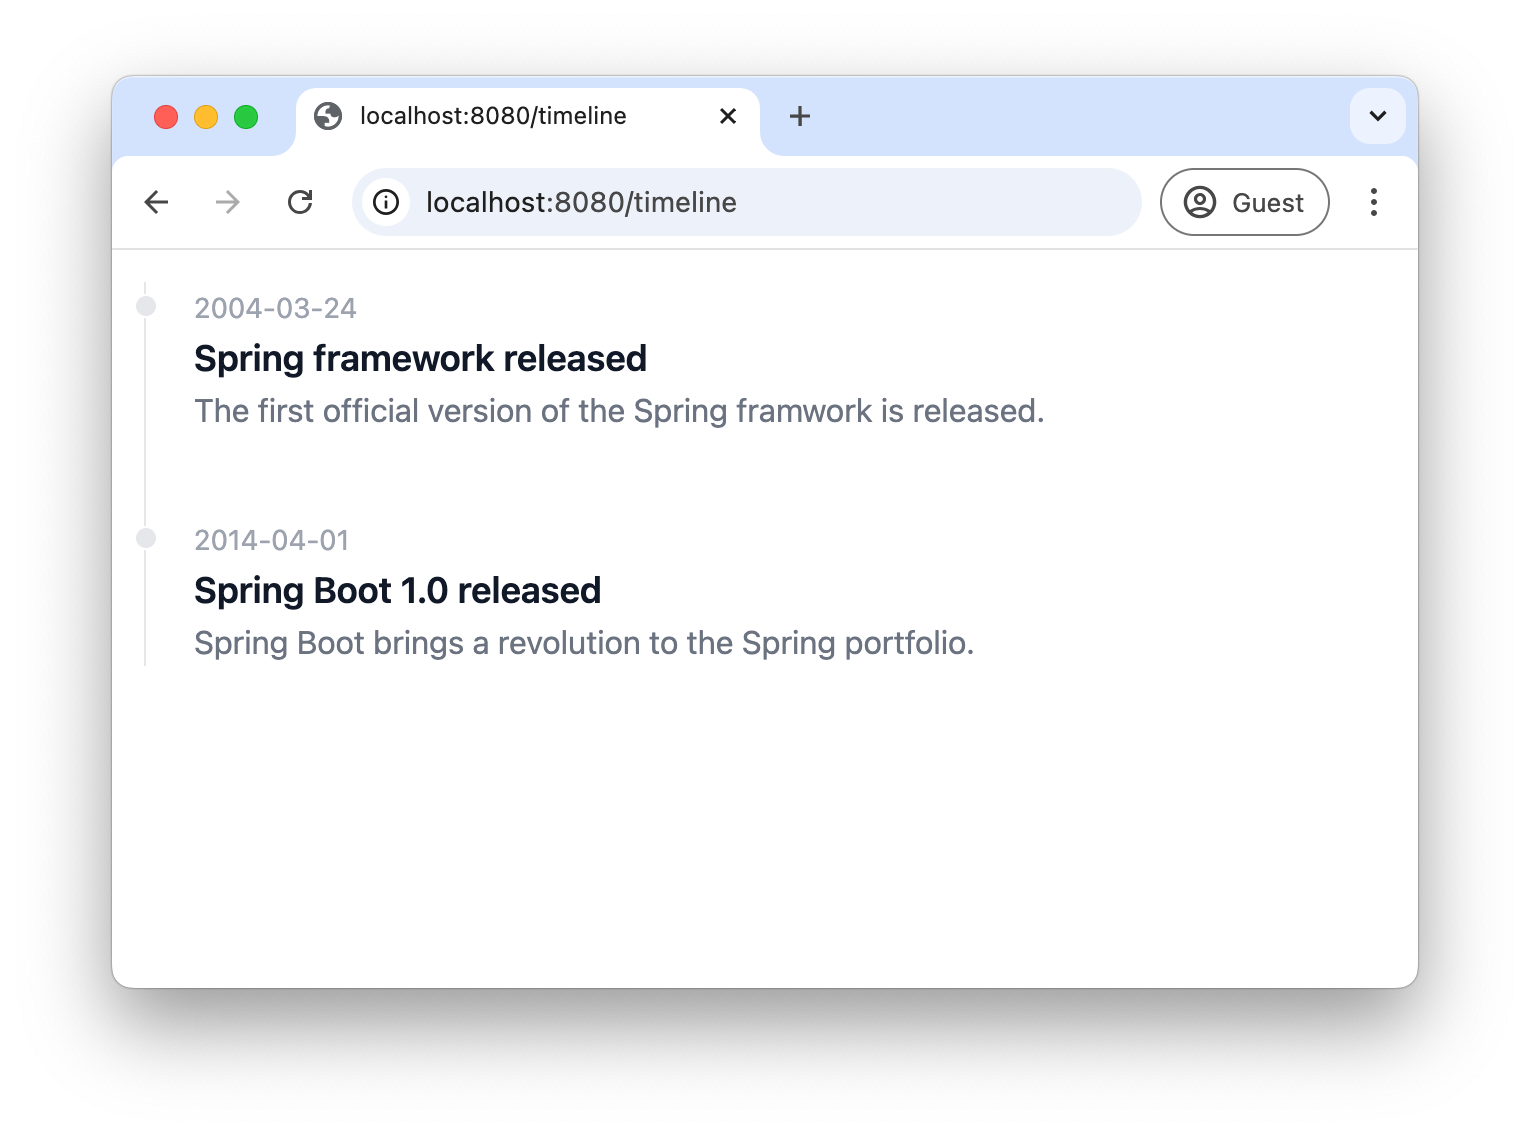
If you check the Dev Tools of the browser, you can see that the data is added to the HTML:
<script type="application/json" id="occurrences-data">
        [{"date":"2004-03-24","title":"Spring framework released","content":"The first official version of the Spring framwork is released."},{"date":"2014-04-01","title":"Spring Boot 1.0 released","content":"Spring Boot brings a revolution to the Spring portfolio."}]
</script>
Production build
For the production build, we have to ensure our React components are known in the options of Vite.
Update vite.config.js to include the necessairy references:
        ...
        rollupOptions: {
            input: [
                '/static/css/application.css',
                '/static/react/ListExample.tsx',
                '/static/react/FlowbiteExample.tsx',
                '/static/react/ButtonBar.tsx',
                '/static/react/OccurencesTimeline.tsx'
            ]
        },
Run npm run build to run the production build.
You can now test this build by running the Spring Boot application.
Make sure the local profile is not active so the production mode of Vite is used.
In the Developer Tools of your browser, you can see the production build is now active because there is something like this in the <head> section:
<head>
  ...
  <link rel="stylesheet" href="assets/application-BJA3xOLB.css">
  <script type="module" src="assets/ListExample-BE9sf6Vz.js"></script>
  <script type="module" src="assets/client-3T5L5Tgj.js"></script>
  <script type="module" src="assets/FlowbiteExample-B6hszCQE.js"></script>
  <script type="module" src="assets/client-3T5L5Tgj.js"></script>
  <script type="module" src="assets/ToggleSwitch-DkReOXgG.js"></script>
  <script type="module" src="assets/client-3T5L5Tgj.js"></script>
  <script type="module" src="assets/ButtonBar-8UAhfTQ4.js"></script>
  <script type="module" src="assets/client-3T5L5Tgj.js"></script>
  <script type="module" src="assets/ToggleSwitch-DkReOXgG.js"></script>
  <script type="module" src="assets/client-3T5L5Tgj.js"></script>
  <script type="module" src="assets/OccurencesTimeline-yZ2aBiJA.js"></script>
  <script type="module" src="assets/client-3T5L5Tgj.js"></script>
  <script type="module" src="assets/ToggleSwitch-DkReOXgG.js"></script>
  <script type="module" src="assets/client-3T5L5Tgj.js"></script>
</head>
Conclusion
In this tutorial, we’ve explored how to seamlessly integrate React components into a Spring Boot Thymeleaf project. We’ve covered setting up the development environment with Vite, creating and styling React components, using third-party React libraries like Flowbite React, passing data from Thymeleaf to React components, and preparing the project for production.
By following these steps, developers can create more dynamic and interactive web applications by using the rich ecosystem of React components, while still benefiting from the simplicity and power of Spring Boot and Thymeleaf.
See thymeleaf-react on GitHub for the full sources of this example.
If you have any questions or remarks, feel free to post a comment at GitHub discussions.